Author: Tara Neill

29 Sep 2019

Improving Ergonomics in the Workplace for Modern Radiology Suites

As a radiologist, you’ve been able to make huge strides in efficiency in the past few years. Filmless digital images that can be viewed anywhere let you work wherever you wish. PACS permits you to send images to referring physicians in seconds. Smart radiology tools can do amazing things automatically, such as identifying subtle changes over time.

What you probably haven’t paid as much attention to: Your reading room design.

While monitors have gotten slimmer, brighter, and higher in resolution, and software has been getting more robust, the radiology community simply hasn’t been focused on improving ergonomics in the workplace. A poorly set-up radiology workstation can have noticeable impacts on your overall health and well-being, as well as your efficiency.

When you say that any old desk, chair, or monitor will do, you’re essentially agreeing to decreased productivity from not being in the ideal position to view images. You’re also putting yourself at risk for repetitive stress injuries, eye strain, neck and shoulder pain, and backache. Here’s how haphazard medical workstation organization could be costing you, and what you can do to improve your ergonomics for safety and functionality:

Ergonomics and Safety

 
Your Head: Poor Position Can Lead to Eye Strain and Neck Compression

The Problem: You need to look at many different areas, from monitor to keyboard, to reference materials, or to worklist or dictation programs, that are to the side of your primary screen.

The Physical Issue: Straining your neck to properly view all your materials, both on-screen and off, can cause tension in your neck muscles and lead to headaches. Eventually, you could develop compressed neck vertebrae.

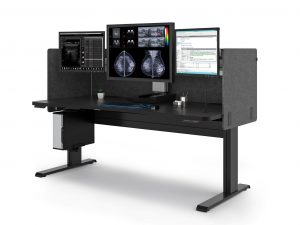
The Change: If you’re using a workstation for more than 2 hours, it should be organized so your primary monitor and keyboard are directly in front of you.

The Ideal: Your neck is in a neutral position, and you’re using a document holder positioned right next to your screen so you don’t need to swivel your neck constantly.

Your Hands: Wrong Keyboard Placement Costs You from Elbows to Fingertips

The Problem: Poor positioning of your keyboard results in your shoulders being hunched, your elbows being bent awkwardly, and your wrists at the wrong angle.

The Physical Issue: Your posture can suffer as your shoulders roll forward for long periods of time. The strain on your hands can lead to carpal tunnel problems and issues with tendons and ligaments in your elbows.

The Change: You’ll want to make sure your keyboard is positioned where your arms fall in a position immediately in front of you at a relaxed 90° angle.

The Ideal: You sit relaxed in front of your workstation, with your upper arms relaxed and your elbows comfortably close to your body.

Your Back: Misaligned Chairs Force Your Back into Unnatural Postures

The Problem: Your chair is too high, has too much (or not enough) cushioning, and lacks a suitable backrest for lumbar support.

The Physical Issue: Your slumped shoulders lead your back into incorrect posture and place strain on the muscles of your upper and lower back.

The Change: You should improve your ergonomics by adjusting your workplace chair to fit your body and allowing your feet to rest comfortably on the floor in front of you. You also need to be seated in a chair with moderate cushioning and lumbar support for your lower back.

The Ideal: Your posture is correct, with spine straight and shoulders in place. Your feet don’t strain to reach the floor.

Your Environment: Problematic Airflow, Sound, and Lighting All Reduce Efficiency

Three main problems can crop up in your workstation environment, leading to problems with productivity due to compromised focus.

Temperature and Ventilation. For desk work, you’ll want to be sitting in a room that’s between 68°F and 75°F, with humidity between 40% and 60%. Unfortunately, computer equipment, monitors, and other electronics lead to warmer temps and drier air, so you’ll want to be sure you can adjust as needed. Air conditioning that responds rapidly to changes should be available.

Sound. High levels of unnecessary background noise — even white noise, like that caused by air conditioning systems or computer fans — can decrease your attention span and increase fatigue. In a busy medical office or hospital, you’re probably also listening to paging systems, phone calls, and noise from nearby colleagues. Remove noise equipment from radiology workstations and install acoustic dampening materials such as carpeting and paneling that can reduce outside sounds.

Ambient Lighting. Light boxes and windows can add glare and unwanted light when you’re reviewing images on a high-resolution monitor. Without control over these outside sources of light, viewing the screen can be challenging. Task lighting can give you more control over how much light you use for reading off paper or working on a screen, and dimmer switches should permit exact adjustment of lighting. In fact, ergonomics play a role in eye safety, as lighting has a huge impact on overall eye health.

Why Improving your Ergonomic Desk Setup Really Matters

The bottom line is that the way you position your body makes a big difference in how productive you are. The right radiology workstation that merges ergonomics with safety, and is adjusted specifically to you, can help you reduce fatigue, muscle strain, and the risk of repetitive motion injury.

Contact the experts at Double Black Imaging for more information on improving ergonomics in your workplace!

29 Aug 2019

Do Your Diagnostic LCD Monitors Meet the Guidelines?

As diagnostic medicine moved from film to the computer screen, medical professionals found that reasonable guidelines were needed to control how diagnostic monitors display images. Consistent output ensures that medical professionals around the globe are able to view images and make accurate diagnoses.

To establish consistency for diagnostic LCD monitor requirements, the American College of Radiology developed the ACR Technical Standard for Electronic Practice of Medical Imaging. The standard was first set forth in 1994 and is updated regularly. Today, it is also endorsed by and revised in conjunction with the American Association of Physicists in Medicine (AAPM) and the Society for Imaging Informatics in Medicine (SIIM).

This standard covers not only how images are displayed, but how they are captured and stored. Section IV-D of the ACR standard details the minimum display settings for image quality and resolution. Monitor performance characteristics that define image quality include:

  • Luminance:

    the amount of photon energy that reaches the eye. Ranges for the values of the lowest gray value are 1.2 candelas per meter squared (cd/m2) for mammogram interpretation and 1.0 cd/m2 for other diagnostic interpretation. For the highest gray value, some medical-quality monitors can produce as much as 1200 candelas per meter squared (cd/m2), but the minimum for monitors that are used for mammograms is 420 cd/m2, and all other medical monitors at 350 cd/m2.

  • Contrast:

    the ratio of luminance difference between the darkest black and the brightest white that can be viewed on the screen at one time. The higher the contrast ratio, the more shades of gray (on a monochrome monitor) or colors (on a color monitor) can be viewed. It is ideal for all monitors in a medical facility to have similar ratios to ensure correct interpretation between monitors.  However, an excessively large contrast ratio is not recommended as it exceeds what the human eye can process.

  • Ambient light:

    light in the environment that hits the screen, reducing how its luminance is viewed by the observer.  To minimize eye fatigue, the ambient lighting (ambient illuminance) should be set to 25-50 lux.

  • Matrix size:

    how many pixels are in each mm of screen space. ACR recommends at least 2.5 lp/mm, which translates to at least a 3MP Display. For Mammography, FDA Cleared 5MP or 12MP Displays are recommended.

  • Other standards for diagnostic monitor displays establish guidelines for bit depth or the number of bits displayed per pixel; noise or luminance variation; and response time for a pixel to change from white to black and back again. For full standards, see ACR’s practice parameters for mammography and for other diagnostic interpretation.(Pages 10-12)


Evaluating Medical LCD Display Monitors for Adherence to the ACR Standard

Diagnostic monitor guidelines change as new technology becomes available in the marketplace; for example, CRT screens are no longer used in favor of flat-screen LCDs that provide a less distorted image. The ACR updates its guidelines on a regular basis, and medical practitioners must ensure their diagnostic LCD monitors and other displays adhere to the latest requirements.

A qualified medical display provider can help radiology departments keep up with changes and remove outdated equipment. This provider works with an on-site Imaging Informatics Professional or IT staff to meet the need for maintenance and calibration of displays.


Call to Set Up your On-Site Survey!

The ability to ensure that monitors are properly calibrated is especially important for all diagnostic monitors. Displays that incorporate front sensors can automatically calibrate for the DICOM 3.14 radiologic standard. Without front sensors and auto-calibrating software, each display must be manually calibrated. A medical display provider can and should explain the importance of calibration and assist a medical practice with determining the best solution for calibrating to standard on a regular and consistent schedule.

Choosing the Right Display Provider

Any medical display provider you select to provide displays, whether it be one or hundreds, should be up-to-date with current diagnostic monitors and their guidelines and be able to recommend the best solution for monitors that adhere to the standards and fit your environment and budget. Providers can also assess your existing medical-grade displays.

In addition, your provider should be able to provide quality assurance software that proves adherence to the ACR standard. This software must be able to both control performance and identify any issues that may cause a display to fall out of standard. Software should be updated regularly, and new versions or updates should be installed when available.

The right display provider will also support products as needed. This includes training and follow-up to check that monitors and software tools are being correctly utilized. If you are unable to check display performance, your provider should have trained personnel who can assist you with scheduled calibration checks and maintenance.

Double Black Imaging performs these services from setup to configuration to ongoing training and support. Our calibration software and productivity tools are made in the U.S., and we are current on the established standards for conformance and calibration of medical imaging displays. Contact us for more information about medical monitor and calibration training for your staff or ongoing monitoring and maintenance of your medical-grade displays.